Form validation with Aurelia
Posted on 2017-01-24 in Aurelia Last modified on: 2017-07-20
Note
Update from 2017-01-25: after new exchanges with Doug Kent I was able to improve my workaround to disable the submission of the form until it is valid. See the Disable the submission until the form is valid section for the code.
I promised some months ago that I will talk about form validation with Aurelia. At that time, the validation plugin was still under heavy development. Furthermore, aurelia-validation was dropped in favour of aurelia-validatejs and then aurelia-validatejs was dropped for aurelia-validation. Now things look to have settled down for aurelia-validation. That's what I'll talk about today.
From what I see in the documentation, the plugin is both powerful and expressive (many rules available, possibility to chain them, error reporting, possibility to create your own rules, possibility to hook on the render phase, …).
Quick overview
To get started, you need to:
- Install aurelia-validation: npm install --save aurelia-validation
- Enable it in your application (in your main.js):
aurelia.use
  .standardConfiguration()
  .plugin('aurelia-validation')
  .developmentLogging();
The more direct way to use validation is to:
- Import ValidationControllerFactory and ValidationRules from aurelia-validation
- Inject ValidationControllerFactory in you component @inject(ValidationControllerFactory)
- Create the validation controller: this.controller = controllerFactory.createForCurrentScope();
- Use ValidationRules to create some validation rules. For instance to make a field named title of the current class mandatory: ValidationRules.ensure('title').required().on(this);
In a nutshell, this JavaScript code:
import { inject } from 'aurelia-framework';
import { ValidationControllerFactory, ValidationRules } from 'aurelia-validation';


@inject(ValidationControllerFactory)
export class TodoPage {
    constructor(controllerFactory) {
        this.controller = controllerFactory.createForCurrentScope();
        ValidationRules
            .ensure('title').required()
            .on(this);
    }
}
with this template:
<template>
    <input type="text" placeholder="Title" value.bind="title & validate" required>
</template>
You probably want to view the list of validation errors. To do that, you can use the validation-errors attribute like that:
<template>
    <div validation-errors.bind="errors">
        <input type="text" placeholder="Title" value.bind="title & validate" required>

        <ul if.bind="controller.errors">
            <li repeat.for="error of controller.errors">
                ${error.message}
            </li>
        </ul>
    </div>
</template>
This will display the default error message for each rule that failed. You can change this message with withMessage: ValidationRules.ensure('title').required().withMessage('Title must be provided in this form.').on(this). You can also use aurelia-i18n to translate these messages (see the documentation).
More advanced example
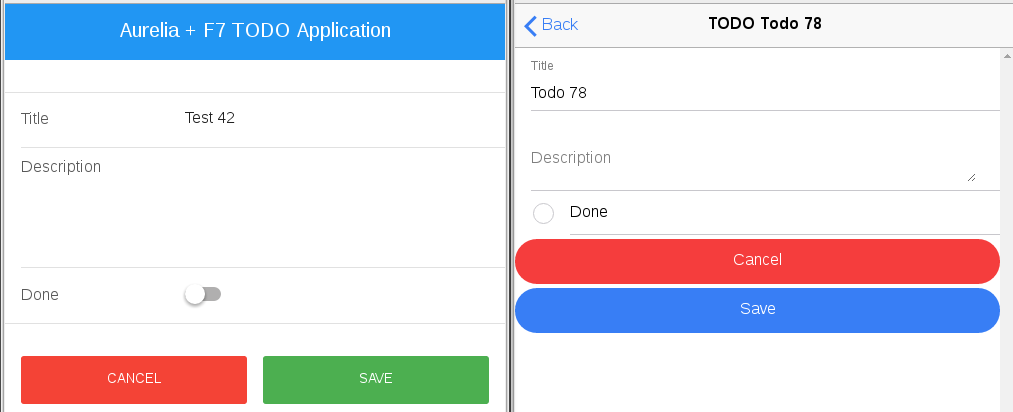
Now that we've covered the basics, let's get back to my mobile todo application built with Aurelia and Framework7. I have a form to create a TODO that requires a title:
My goal is to use aurelia-validation to:
Prevent the user to create a TODO until a title with at least 3 characters is supplied (just to see how we can chain rules for a property). In order to to that, I just need to use the proper validation rules (since the title is stored in a todo property of my object, I don't use .on(this) but .on(this.todo):
ValidationRules
      .ensure('title').required().minLength(3).withMessage('Title must at least be 3 chars long.')
      .on(this.todo);
Display an error message next to the title with a proper error message. This message will of course be updated as the user types. To achieve that, I need to:
Change how validation is trigger: by default it is on blur (that is when the user leaves the field). Let's import validateTrigger and update our controller: this.controller.validateTrigger = validateTrigger.changeOrBlur;
Use the validation-errors attribute on an element that only contains the input for my title. This way, the value bound to it will only contain errors for this field (by construction, validation-errors contains errors only for the fields it contains):
<div class="item-inner" validation-errors.bind="titleErrors">
    <div class="item-title label">
        Title
        <strong repeat.for="errorInfo of titleErrors">${errorInfo.error.message}</strong>
    </div>
    <div class="item-input">
        <!-- again since the title is in todo, I have to use todo.title, not just title -->
        <input type="text" placeholder="Title" value.bind="todo.title & validate" required>
    </div>
</div>
Disable the submission until the form is valid
At this point I ran into a problem: how can I disable the submission of a TODO until it is valid? If I use validation-errors.bind="errors" on an element that includes the full form, I can use errors.length === 0 to check that it is valid. The problem is, that when the page loads, the form is invalid but since validation hasn't run yet, the submit button will be active. If I validate the form in the attached method of the component, errors is not empty (so the button is correctly disabled) but the error message for the title is displayed too soon (before the user event interacted with the form which is not what I want).
In Angular2, you can rely on the dirty property of your form controller to know if the user has started to interact with the form. So I could use something like controller.dirty && errors.length === 0 to enable/disable my button (see this article for form validation with Angular2).
There a way to easily do this with aurelia. See Workaround 3 (how you should do it).
Workaround 1
I asked on gitter for help and Doug Kent suggested various solutions the most promising being to use two controllers: one to validate the button, one to display the error. I didn't managed to get it to work but, based on this idea, I found a workaround (and I hope we will have a clean method to do this in the future):
- I keep the controller as is for validation and error display.
- I use a Validator to manually validate the form without impacting error reporting. The idea is to:
- Validate the form in attached: this form can also be used to edit an existing todo (which has a valid title), so the save button can be enabled or disabled on page load. This validation is done with the Validator which means no errors will be reported to the user.
- Watch on the title property of my todo and validate the form each time it changes.
Here is the relevant part of the code:
import { inject, ObserverLocator } from 'aurelia-framework';
import { ValidationControllerFactory, ValidationRules, Validator, validateTrigger } from 'aurelia-validation';


@inject(ValidationControllerFactory, Validator, ObserverLocator)
export class TodoPage {
    constructor(controllerFactory, validator, ol) {
        // We rely on the controller to display the errors.
        this.controller = controllerFactory.createForCurrentScope();
        // We rely on the validator to know if the canSave the todo or not
        // (update the canSave property in the validation method)
        this.validator = validator;
        this.canSave = false;

        this.todo = {};
        ValidationRules
            .ensure('title').required().minLength(3).withMessage('Title must at least be 3 chars long.')
            .on(this.todo);
        this.controller.validateTrigger = validateTrigger.changeOrBlur;

        ol.getObserver(this.todo, 'title').subscribe(() => {
            this.validate();
        });
    }

    attached() {
        this.validate();
    }

    validate() {
        this.validator.validateObject(this.todo).then(results => {
            let valid = true;

            // results is an array of validation results. Each result has a
            // valid property set to true if the rule is valid.
            for (let result of results) {
                valid = valid && result.valid;
            }

            this.canSave = valid;
        });
    }
}
I then use canSave in my template:
<a href="#"
   class="button button-big button-fill color-green ${canSave ? '' : 'disabled'}"
   click.delegate="saveTodo()">Save</a>
You can view the full code here and here. It feels a bit hackish and I don't think this will scale to big forms.
Workaround 2 (looks more solid)
After new exchanges on gitter, Doug Kent made another suggestion: use a custom validator instead of StandardValidator. This way I should be able to hook on the validation phase and call a callback. Guess what: it worked. Let's see how.
We start by creating an new class respecting the Validator interface and taking as argument an instance of the StandardValidator which will do the actual validation work and a callback:
constructor(validator, cb) {
    this.validator = validator;
    this.cb = cb;
}
The idea is then to use the promise returned by this.validator.validateObject to call our callback each time the promise is resolved:
validateObject(object, rules) {
    return this.validator.validateObject(object, rules).then(results => {
        this.cb(results);
        return results;
    });
}
We are almost done. We also need to trigger the validation when a property of the form is validated. For instance, here, when the user modifies the title of the todo, validateObject won't be called. The controller will only call validateProperty. That's not a big problem: once the property is validated, we can validate the whole form to update TodoPage.canSave:
validateObject(object, rules) {
    return this.validator.validateObject(object, rules).then(results => {
        this.cb(results);
        return results;
    });
}
Now let's see how we can use this. We initialize the validator and the controller in the constructor:
// validator is an instance of StandardValidator that was injected by DI.
this.validator = new TodoValidator(validator, results => this.updateCanSave(results));
this.controller = controllerFactory.createForCurrentScope(this.validator);
this.controller.validateTrigger = validateTrigger.changeOrBlur;
Since this page can be used in two cases (creating a new todo and editing an existing one), we differ the creation of the validation rules a little bit: if we set them up in the constructor, they wouldn't apply on the proper object when editing a TODO. We wait for the activation and the page to distinguish between these to cases:
Creating a new TODO
this.todo = {};
this.setupValidation();
Editing a TODO
this.storage.getTodo(params.id)  // Fetch the TODO.
    .then(todo => this.todo = todo)  // Save the TODO in the current object.
    .then(() => {
        // Setup the validation rules.
        this.setupValidation();
        // Launch validation to enable the save button if the edited TODO is valid.
        this.validate();
    });
The setupValidation method is just here to create our validation rules:
ValidationRules
        .ensure('title').required().minLength(3).withMessage('Title must at least be 3 chars long.')
        .on(this.todo);
The validate method just calls this.validator.validateObject(this.todo);. As for updateCanSave it updates the canSave property based on the results of the validation:
updateCanSave(validationResults) {
    let valid = true;

    for (let result of validationResults) {
        valid = valid && result.valid;
    }

    this.canSave = valid;
}
And that's it. The main advantage of this method, is that no matter how many fields you have, you don't need extra work. It can also easily be reused for different forms. You can see the full code here (with additional comments) and here (template).
Workaround 3 (how you should do it)
As a follow up to this issue work has been done by Aurelia's contributor Jeremy Danyow so we can execute a callback each time the validator is called. This greatly simplifies the code. You can view the documentation here.
In the constructor, we create the controller with a new validator and register the callback:
constructor(validator, controllerFactory) {
    this.canSave = false;
    this.controller = controllerFactory.createForCurrentScope(validator);
    this.controller.validateTrigger = validateTrigger.changeOrBlur;
    this.controller.subscribe(event => this.validateWhole());
}
The callback passed to this.controller.subscribe will be called each time the validator is run, for reset and validate events. It has one parameter: the event. You can use it to filter by validation type or to get the errors associated with this run. Go here to view the full interface.
Note: We don't need to manually run this.validateWhole manually to initialize canSave correctly. When the form is created and validation is bootstraped, the validator will run with a reset event.
In our case, we want to validate the whole form each time a field is validated so we can update our canSave property:
private validateWhole() {
    this.validator.validateObject(this.todo)
        .then(results => this.canSave = results.every(result => result.valid));
}
And we are done. This is much simplier and shorter that all the other workaround.
Note: Running validation will not display errors messages associated to any field. So even if you validate multiple fields and display error messages for each one, validateWhole will not have an impact.
You can view the full file here and the associated template here.
Conclusion
You should now be able to validate your forms with Aurelia. If you have a question or a remark, please leave a comment.