PWAs and Django
In this article, I'll guide you to create a PWA with the Django framework. All the code for this project is available under my gitlab account. You will find in each section links to the relevant commits to help you follow. If something is not clear or if you have a question, please leave a comment below.
Updates:
- On 2020-10-12: as pointed out by Ernest by email, the workbox version was missing the version number in the ServiceWorker. It is required to update it and recache pages. It is now fixed.
Prerequisites
I expect you to be at ease with Django and to have some knowledge of modern JavaScript (ES6+). You don't need much JavaScript: basic knowledge, fat arrow functions and Promise should be enough. No pre-requisites on PWA are required, this article includes a section to demystify them if needed.
PWA basics
Simply put, PWAs are "installed" web pages: when you browse a website that is a PWA, you will be prompted to install it. If you accept, you will see the icon of the APP on your home screen (like any other app) and if you press this icon, the PWA will launch in full-screen mode just like a native app. But you didn't go to the app store to install it. It's still just a website.
As a developer, building a PWA means:
- Your users don't have to install it: they can use the app directly on the website without installing anything and you'll still be able to provide them with advanced features like caching and offline support.
- You will have more control on when you can update it: no need to submit it to the app store and wait for validation. Just push files to your server. The update will occur the next time your users reopen the app.
- You are not bound by the rules of any app stores.
- The app will work on any device with a recent browser. Chrome has the best support for PWAs right now, Firefox is quite good but Safari support can be an issue (even if it's getting better, see this article for instance).
- The app can be progressively enhanced (eg by adding better offline support or better caching).
- You show notifications the user with the Notification API and the Push API.
- You can access some native features (like the camera or the microphone). If you want to access all native features or require very high performance (for a video game, for instance), you still need to do a native app.
Here are the basic components needed to make a PWA:
manifest.json: it's a JSON file describing how the app must be displayed and installed. You'll use it to specify the name, icon, orientation and some display properties of your app. See here for more details. It is required to make your app a PWA.
ServiceWorker (SW for short): it behaves like a proxy server between your app and the network. It will keep working even when the tab is closed. So it will allow you to:
- Have caching and offline support.
- Sync things in the background.
- Subscribe to notifications of the Push API and display them to users.
Please note that:
- It only works over HTTPS (except for localhost so you can develop without certificates).
- It cannot access the DOM.
- It may apply to all or only a subset of your site.
- It must be registered to have an effect.
- It will only get updated if its content changes and after the tab is closed and reopens (unless you use the dev tools and force it to reload on change but that's not an option for your users, more on that below).
See here for more. It is required to make your app a PWA.
indexDB: where you put data to exchange with the SW (SW cannot access localStorage). See here for more information.
Many other APIs I'll just list here so you know what you can do:
- Notification API to display notifications to the user.
- Push API to receive messages from a server.
- Many more: geolocation, camera access, …
Note
This section is heavily inspired by the similar section from my article Writing a PWA with Aurelia.
Building a PWA with Django
Create a Django website
Obvious isn't it? For the purpose of this tutorial, I created a basic site with Django and a few pages. You can, of course, follow the following sections to add PWA support to your own site.
The repository with all the code is located here. To use the project, you will need to create a virtual environment and install Django in it. The code was tested with Django 2.2 but it should work correctly with any more recent versions of Django. You can install the project with Pipenv:
- Installation of the dependencies: pipenv install
- Run the default migrations (this will create a SQlite database): pipenv run python manage.py migrate
- Start the server: pipenv run python manage.py runserver
The commits associated with this section (nothing relating with PWA so far):
Adding a manifest.json
As said in the previous section, the manifest is a JSON file that will allow your app to be installed. Since its content shouldn't change often, I think we can include it in the static folder with hard-coded values.
You can find Django apps that will allow you to configure this with settings variable but I don't recommend them. The file is simple and rarely changes, so I don't think it's worth adding a dependency to your project just for that.
In my case, it is in djangopwa/static/manifest.json with this content:
{
    "name": "Django PWA",
    "short_name": "djangopwa",
    "start_url": "/",
    "scope": ".",
    "display": "standalone",
    "background_color": "#FFF",
    "theme_color": "#493174",
    "description": "Test app for Django and PWA",
    "dir": "ltr",
    "lang": "en-US",
    "orientation": "portrait-primary",
    "icons": [{
        "src": "/static/icons/aurss.96x96.png",
        "type": "image/png",
        "sizes": "96x96"
    }, {
        "src": "/static/icons/aurss.512x512.png",
        "type": "image/png",
        "sizes": "512x512"
    }]
}
We can now update our base template to load it on every page:
<!-- This is to define the viewport and how the app must behave when on full screen. This is required too. -->
<meta name="viewport" content="width=device-width, initial-scale=1">
<link rel="manifest" href="{% static 'manifest.json' %}">
While we are at it, we can also update our base template to add better compatibility with IE11 and Safari by adding:
<meta name="theme-color" content="#493174">
<link rel="apple-touch-icon" href="{% static 'icons/aurss.192x192.png' %}">
Now your app can be installed on the home screen but it's not a PWA yet. It's missing a ServiceWorker. That's the subject of the next section.
The commits associated with this section:
Adding a basic ServiceWorker
The service worker is defined in a JavaScript file that must be served at the root of your application. If it is under /static its URL will be something like /static/sw.js. It means that the scope of your ServiceWorker (ie the pages it is activated on), must be under /static. This means that it won't be enabled for our whole site (which is what we want, limiting it to /static makes it unusable on standard pages so it would be quite useless). So it must be served by something like http://wwww.example.com/sw.js.
To achieve this, I created a simple TemplateView that will serve a file named sw.js. The file is created from a template. It will also be interesting to have a template for this later.
We do this by adding the following code into our main URL file djangopwa/urls.py:
Then, in djangopwa/templates/sw.js, we can add the basic structure of our ServiceWorker:
// Bump this version number each time a cached or asset changes.
// If you don't, the SW won't be reinstalled and the pages you cache initially won't be updated
// (by default at least, see next sections for more on caching).
const VERSION = '{{ version }}';

self.addEventListener('install', (event) => {
    console.log('[SW] Installing SW version:', VERSION);
});
The commits associated with this section:
Is this a PWA?
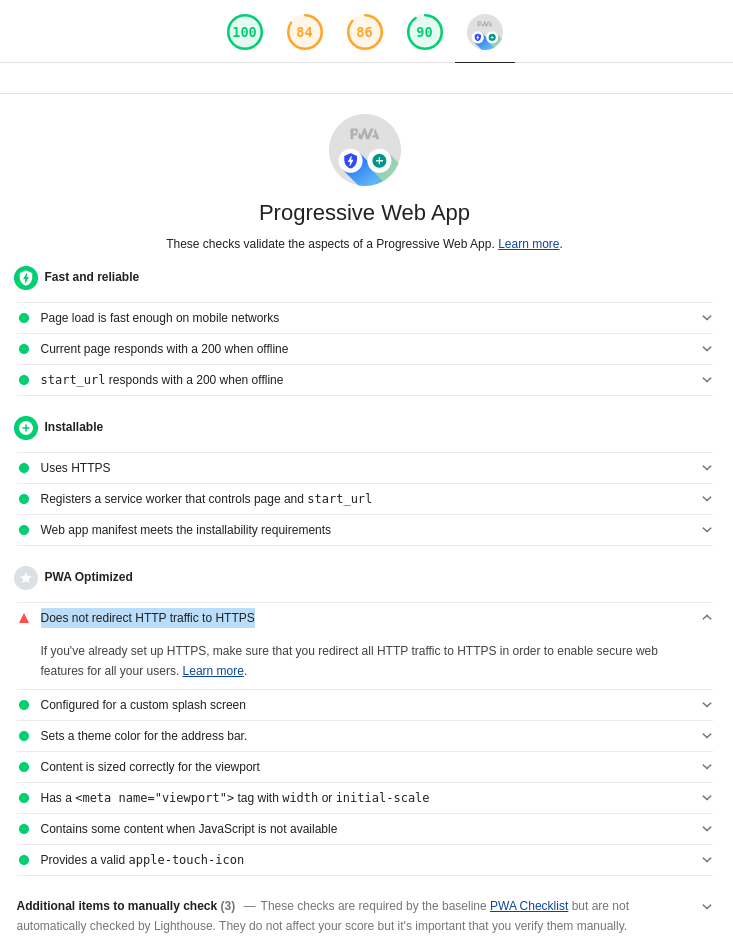
We should check shouldn't we? The easiest way to do this is to open Chrome and open the dev tools (although other browsers support PWA, Chrome right now provides the best developer experience with its Audits and Application tabs). Open the Audits tab, make sure Progressive Web App is selected under the Audits section and run one. The only problematic item should be Does not redirect HTTP traffic to HTTPS which is normal, since we are running the application locally without HTTPS.
So yes, we successfully made a PWA. A very basic one we will improve in the upcoming sections. And you know the last item you'll have to respect before putting it into production: serve it under HTTPS and make sure all HTTP traffic is redirected to HTTPS.
Before going further, I'd like to present to you the Application tab of the Chrome dev tools. When working with a PWA, it will be the most useful tab. It allows you to:
- Inspect the manifest.
- Manage the service worker. I suggest you tick Update on reload to update the Service Worker each time it is modified and you reload the page. If you don't, you will have to close the tab and open it again for the Service Worker to update, which is cumbersome during development. If you have an issue with this option, disable it, close the tab and reopen it to trigger a standard update of the ServiceWorker.
- See the content of the various storage.
- Inspect and flush the cache storage where the Service Worker will save the content of your HTTP requests. This is very handy when testing.
Add basic caching
Now we can cache some pages and serve the pages from the cache instead of from the network. The pages will be added to the cache when the SW is installed (they will be pre-cached) and won't be updated afterwards. Pre-caching is interesting for pages you know will be accessed or for static assets. We will handle updates later.
To do so, we will update the function that reacts to the install event (which is triggered when the SW installs) to pre-cache some pages:
const VERSION = '{{ version }}';
const staticCachePrefix = 'static';
const staticCacheName = `${staticCachePrefix}-${VERSION}`;

event.waitUntil(
    caches.open(staticCacheName)
        .then(cache => {
            console.log('[SW] Caching app shell');
            // All the pages supplied here will be set in the cache when the service worker installs.
            // If the service worker is updated, these pages will be updated in the cache.
            // So it can be a good idea to inject the version of the project in the template
            // to be sure the SW will be updated (and thus the pre-cached assets) when the project is.
            cache.addAll([
                '/static/manifest.json',
                '/',
                '/offline/',
            ]);
        }),
);
Then we must add an event listener for the fetch event so we can respond with the pages from the cache. This event is triggered each time the browser tries to do an HTTP request when you click on a link or use the fetch API (don't use the xhr object or jQuery.ajax, it doesn't fit well with SW because the fetch event is not triggered). We can do this by adding the code below in the sw.js file:
self.addEventListener('fetch', (event) => {
    // Let the browser do its default thing
    // for non-GET requests. It's not safe to cache them anyway.
    if (event.request.method !== 'GET') {
        return;
    }

    event.respondWith(
        caches.match(event.request)
            .then((response) => {
                // If we have the response in the cache, we return it.
                // If not, we try to fetch it.
                return response || fetch(event.request);
            }),
    );
});
Pre-caching is nice but you will most likely have many dynamic pages on your site and you can't pre-cache them all (most of them won't be accessed by your users anyway). But you may still want to cache them. If you don't want to cache all of them, you can rely on event.request.url to test if the page must be cached or not. By slightly updating the handler above, we can cache dynamic pages:
// Move this line with the constants at the top of the file.
const dynamicCacheName = 'dynamic';

event.respondWith(
    caches.match(event.request)
        .then((response) => {
            console.log(`[SW] Requesting ${event.request.url}.`)
            // If we have the response in the cache, we return it.
            // If not, we try to fetch it.
            if (response) {
                console.log(`[SW] Served response to ${event.request.url} from the cache.`);
                return response;
            }

            return fetch(event.request)
                .then(res => {
                    return caches.open(dynamicCacheName)
                        .then(cache => {
                            // We can read a response only once. So if we don't clone it here,
                            // we won't be able to see anything in the browser.
                            cache.put(event.request.url, res.clone());
                            return res;
                        })
                })
                .catch(err => console.warn('Warning: app is offline', err));
        }),
);
Tada, you can now cache any page. Be sure to use a different cache for the dynamic pages. It will be useful later when we will clean the cache. To test this, you can go to any URLs like /say-something/SOMETHING. If you use hi or bye you will see the page. Otherwise, you will see a 404.
This version has a problem, though. It will cache all pages even if the request fails (with a 500 or a 404 for instance). So we will cache pages we don't want to cache. To avoid this, before return caches.open(dynamicCacheName), you can add the code below to answer with the raw request with the request failed:
const requestSucceeded = res.status >= 200 && res.status <= 300;
if (!requestSucceeded) {
    return res;
}
The commits associated with this section:
Add offline support
Now that we have set up caching, we can provide offline support to our users. If the network is down, we will display them a page explaining they are currently offline instead of displaying the error page from the browser. To do so, we will once again update the handler associated with the fetch event. We will replace the line .catch(err => console.warn('Warning: app is offline', err)); by the code below:
.catch(err => {
    console.warn('[SW] Network request failed, app is probably offline', err);
    return caches.open(staticCacheName)
        .then((cache) => {
            // If the request expects an HTML response, we display the offline page.
            if (event.request.headers.get('accept').includes('text/html')) {
                return cache.match('/offline/');
            }

            return Promise.reject();
        })
        .catch(err => console.warn('[SW] failed to get response from network and cache.', err));
});
Now, in the dev tools, go offline (you may have to un-tick Update on reload to witness the proper behavior and to re-open the tab). You can do this in the Network tab under or in the Application tab under Service Workers. Navigate to a new page (that's not in the cache, for instance /toto). You should see your offline page. Go back online, refresh the page and you should see the standard 404 page from Django.
The commit associated with this section:
Caching strategies
That's all very interesting, but right now, if a page of your site updates and it is in the cache, you must remove it from the cache with the dev tools and reload the page to see the update. Not very practical and none of your users will do this. So we need to tune our caching strategy. Let's detail them now so we know what to choose.
There are various strategies you can implement:
- Network only: always go to the network, cache nothing. That's the default behavior.
- Cache only: always go to the cache, never reach the network.
- Cache with network fallback: if the response is in the cache, use it. Otherwise, go to the network. That's what we are using now.
- Network with cache fallback: try to use the network, if it fails, use the cache. If the network is slow, the requests will take time to fail so this will provide a poor experience.
- Cache then network: give the response that's in the cache (if present) to answer fast then make an HTTP request to update the cache.
The strategy to use depends on what kind of app you are building, the type of content associated with the URL, the domain you are requesting (yours or someone else's)… I can't give you a general answer.
I can strongly suggest you to never cache any request that's not a GET request: if a request have sides effects (PUT, POST, PATCH), it's not safe to cache the results. It's common HTTP wisdom and practice. However, you can rely on the Service Worker to save the payload of a POST in indexDB when the network is down so you can do the request once the network is back online. I won't talk about it in this article. If you are interested, I have an example in a small app I built.
Here, I'll propose a slight variation of the Network with cache fallback: we will try to reach the network to provide the most up-to-date version of the page but if it fails within a timeout, then we will provide the version of the cache. If the request were to succeed anyway, we will update the cache. It looks like a good compromise.
Before implementing this, I added a view that responds in a variable amount of time between 0s and 10s to easily simulate a page that takes time to respond. You can access it under /random-response. I also refactored the code of the Service Worker a bit to clarify the code and ease the implementation. Now each "step" is in their own functions: getFromCache, tryToFetchAndSaveInCache, fetchAndSaveInCache and provideOfflineFallback. You can find links to the relevant commits below, I won't detail in the article.
Now that it's done, I can create a new function networkThenCache that does what we wish to implement:
// In milliseconds.
const networkWaitTime = 2000;

function networkThenCache(event) {
    return Promise.race([
        tryToFetchAndSaveInCache(event, dynamicCacheName),
        new Promise((resolve, reject) => setTimeout(reject, networkWaitTime))
    ])
        .then(
            (response) => response,
            () => getFromCache(event).catch(() => provideOfflineFallback(event))
        );
}
With Promise.race returns a promise that will resolve when the first promise in the array we give it resolves. So here, it will resolve when we get a response from the network or after 2s with the response from the cache. If we don't have a response in the cache, we will display the offline fallback. It's not perfect: if you don't have a response in the cache, you may want to wait more for the network to respond. But at least it's a start and you can adapt it to fit your needs.
We also have to update our response to the fetch event:
event.respondWith(
    networkThenCache(event),
);
Now if you go to /random-response, you will see (the time spent sleeping in the view is displayed in the console and on the page):
- The offline page if the first response takes too much time.
- The response supplied by the view if it answered in less than 2s.
- The response from the cache if the view took more than 2s.
One interesting thing is that, since promise chains can't be canceled, if the network request does succeed, it will update the cache. You can test it and see if you inspect the dynamic cache of the application.
The commits associated with this section:
Cleaning the cache
We have to kind of caches to clean: the static cache and the dynamic cache. We'll start with the static cache.
The easiest way to clean it is to remove all static caches that are not it. Since we made a clear separation between static and dynamic caches with a prefix, all we need to do is:
self.addEventListener('activate', (event) => {
    console.log('[SW] Cleaning old cache shell');
    event.waitUntil(
        caches.keys()
            .then((keys) => Promise.all(
                keys
                    .filter((key) => key !== staticCacheName && key.startsWith(staticCachePrefix))
                    .map((key) => caches.delete(key))
            )),
    );
});
Cleaning the dynamic cache is a bit trickier. We would like to remove the oldest entries first. You can access all entries in the cache with cache.keys() but you don't have access to the time the item was added to the cache. And you can't rely on the order because it appears to be somewhat random. Furthermore, it is impossible to read headers of a request once it has been cached. Even before, only a small subsets of headers (those viewed as safe) are available. See: this and this.
What can we do? There are several ways to walk around this:
- Just remove entries until we have an acceptable amount of them in the cache. That's quick and dirty but it's really simple to implement.
- Until a service worker is updated, it keeps all objects in memory (you can't see this behavior if Update on reload is ticked). So we can create a map mapping a URL to its response timestamp and use that to find the response to delete. We will also have to delete entries in the dynamic cache we don't know about (or delete the dynamic cache entirely upon installation). From what I read here, this is how the workbox plugin (a plugin to ease working with ServiceWorkers by Google, I talk about it in the Using Workox section) actually works.
- Store the mapping information in indexDB so it persists between updates of the ServiceWorker and delete the entries based on that.
As much as I would like to introduce indexDB in this tutorial, I'll go for solution 2 which is more straightforward (and I think this tutorial is already long enough).
To do so, we will add a constant describing how much items we want to keep in the cache and create a map to keep the association between the requested URLs and the date at which they were seen:
const maxNumberItemsDynamicCache = 5;
const urlsToCacheTimes = new Map();
We now must update it each time we put a response in the dynamic cache and launch a clean:
cache.put(event.request.url, res.clone())
    .then(() => {
        urlsToCacheTimes.set(event.request.url, Date.now());
        return trimCache(cache, maxNumberItemsDynamicCache, urlsToCacheTimes);
    });
And we must add the function to clean the cache:
function trimCache(cache, maxItems, cacheTimeInfos) {
    if (cacheTimeInfos.size <= maxItems) {
        console.log('[SW] Nothing to trim from the cache.');
        return Promise.resolve();
    }

    // We sort all entries by descending dates.
    // We keep a slice of the maxItems more recent items.
    const urlsToKeep = Array.from(cacheTimeInfos.entries())
        .sort((a, b) => a[1] - b[1])
        .reverse()
        .slice(0, maxItems)
        .map(([url, _]) => url);

    console.log('[SW] Keeping in cache', urlsToKeep);
    return cache.keys()
        .then((keys) => {
            const deletions = keys.map(key => {
                if (urlsToKeep.includes(key.url)) {
                    return Promise.resolve();
                }

                console.log(`[SW] Removing ${key.url} from the cache.`);
                cacheTimeInfos.delete(key.url);
                return cache.delete(key);
            });
            return Promise.all(deletions);
        })
        .then(() => console.log('[SW] Done trimming cache.'))
        .catch(() => console.log('[SW] Error while trimming cache.'));
}
Note
You should be able to read the Date header from the response with res.headers.get('Date') if you prefer to rely on the date given by the server.
The commits associated with this section:
Suggestions to further improve dynamic caching
You can read the HTTP header from the responses to fine-tune how you cache a page. For instance, we will not cache a page if it contains the no-cache value in the Control-Cache header. To do so, we will update the fetchAndSaveInCache function:
const requestSucceeded = res.status >= 200 && res.status <= 300;
const mustNotCache = res.headers.get('cache-control').includes('no-cache');
if (!requestSucceeded) {
    console.log('[SW] Request failed.');
    return res;
} else if (mustNotCache) {
    console.log('[SW] The page must not be cached.');
    return res;
}
You can, of course, use headers in more advanced ways: to invalidate the cache based on what the response tells you to do or to fetch a resource directly from the cache if the header allows you.
Tip
You can list all the headers of a response with Array.from(res.headers.entries())). This must be run before the response is cached (as stated above).
The commits associated with this section:
Caching pages with JS and CSS
So far, so good. But our application is lacking styling and JavaScript! To illustrate how it goes, we will only add some CSS to the site. The process for JavaScript is the same.
Let's add some basic style in djangopwa/static/style.css:
h1 {
    color: gray;
    font-weight: bold;
}

.thing-said {
    color: red;
}
And load it in base.html:
<link rel="stylesheet" href="{% static 'style.css' %}">
If you reload the page, you should see all the titles in gray, and the file style.css will be added to the dynamic cache. It's looking quite good by default.
Should we pre-cache it? It's a file that will be requested for every page and that's required on the offline page too. So it makes sense to pre-cache it. But this led to the question: what should we pre-cache? Maybe it's time to answer.
The general advise I've seen is to pre-cache:
- The app shell. That's the resources (CSS and JS) that are required to display the base of the application. They most likely don't change very often and they are required to display all the pages (including our offline pages). This means these files will be requested anyway. So we don't waste anything by preloading them.
- The offline page because, once offline, we won't be able to load it! It also means it's probably a good idea to keep it small and simple.
We could cache other things too. But I think in most cases that's all we need to pre-cache. We don't want to request too many pages or files: they will all be downloaded when the app starts. For our mobile users, we don't want to download too many things to save bandwidth, storage space and power. Plus, we don't know what the users will access so we may cache stuff that's not required. And for the normal pages of the site, we have the dynamic cache to speed things up.
Because these resources are pre-cached, we can switch to a cache only strategy: each time they are requested, we load them from the cache. To avoid issues when you update them, you should make sure their names contain a hash of the file so we can keep them indefinitely. It's a good practice anyway so your CDN can cache these assets indefinitely too. This can be done easily in Django by using the proper static file storage: the ManifestStaticFilesStorage. You can enable it by adding in your setting file: STATICFILES_STORAGE = 'django.contrib.staticfiles.storage.ManifestStaticFilesStorage'. You may want to disable this during development not to hit the cache and see the updated files.
Here is how the ServiceWorkerView and sw.js now looks:
class ServiceWorkerView(TemplateView):
    template_name = 'sw.js'
    content_type = 'application/javascript'
    name = 'sw.js'

    def get_context_data(self, **kwargs):
        return {
            'version': version,
            'icon_url': static('icons/aurss.512x512.png'),
            'manifest_url': static('manifest.json'),
            'style_url': static('style.css'),
            'home_url': reverse('home'),
            'offline_url': reverse('offline'),
        }
const appShell = [
    '{{ icon_url }}',
    '{{ manifest_url }}',
    '{{ style_url }}',
    '{{ home_url }}',
    '{{ offline_url }}',
].map((partialUrl) => `${location.protocol}//${location.host}${partialUrl}`);
Note
I could have used the static and url template tags directly but that would have required to add {% load static %} in sw.js. Since this is not valid JS, my editor reports it as an error, which I find annoying.
The commits associated with this section:
Using Workox
So far, we've all done everything by hand. It's interesting and it's a very good way to learn. However, it can take a lot of time. Here comes Workbox a tool made by Google to automate much of the process. Google describes it as a JavaScript Libraries for adding offline support to web apps. If you search for PWAs you will probably hear about it as it's quite popular and feature complete.
Since the documentation is very complete, I'll just provide an example of ServiceWorker using Workbox with a CDN to help you get started. It should provide more or less the same features as what we wrote by hand. It's much smaller, though (and probably less buggy). The code is on the workbox branch of the repository.
importScripts('https://storage.googleapis.com/workbox-cdn/releases/5.0.0/workbox-sw.js');

const VERSION = '{{ version }}';

if (workbox) {
  console.log(`Yay! Workbox is loaded 🎉`);
} else {
  console.log(`Boo! Workbox didn't load 😬`);
}

const OFFLINE_URL = '{{ offline_url }}';
const appShell = [
    '{{ icon_url }}',
    '{{ manifest_url }}',
    '{{ style_url }}',
    '{{ home_url }}',
    '{{ offline_url }}',
].map((partialUrl) => `${location.protocol}//${location.host}${partialUrl}`);

// Precache the shell.
workbox.precaching.precacheAndRoute(appShell.map(url => ({
    url,
    revision: null,
})));

// Serve the app shell from the cache.
workbox.routing.registerRoute(({url}) => appShell.includes(url), new workbox.strategies.CacheOnly());

// Serve the other pages from the cache and make a request to update the value in the cache.
// Limit the cache to 5 entries.
workbox.routing.registerRoute(
    ({url}) => !appShell.includes(url),
    new workbox.strategies.StaleWhileRevalidate({
        cacheName: 'dynamic-cache',
        plugins: [new workbox.expiration.ExpirationPlugin({
            maxEntries: 5,
        })],
    })
);

// Handle offline.
// From https://developers.google.com/web/tools/workbox/guides/advanced-recipes#provide_a_fallback_response_to_a_route
workbox.routing.setCatchHandler(({ event }) => {
    console.log(event)
    switch (event.request.method) {
        case 'GET':
            return caches.match(OFFLINE_URL);
        default:
            return Response.error();
    }
});
The commits associated with this section:
Conclusion
That was quite a journey! Normally you should now be able to create a PWA with Django from scratch. You should also be able to understand the main concepts of a PWA. And you'll probably want to use Workbox to ease the writing of the ServiceWorker in your own app. But learning how it works behind the scenes will ease debugging and understanding of the documentation of Workbox.
If you have any remarks or questions, please leave a comment below.